Splitgraph has been acquired by EDB! Read the blog post.
Querying Stripe data with Splitgraph
Keep data from Stripe (plus more than 100 other data sources) in sync with Splitgraph for easy querying!
What you will build in this guide
time required: 4 minutes
Imagine if analysing Stripe data was as simple as querying an SQL database. With
Splitgraph, it is! In this guide, we create a splitgraph.yml file to
periodically sync data from a Stripe account to a private Splitgraph repository.
Splitgraph supports over 100 data sources, so you don't need to be using Stripe to follow along!
How it works
The simplest way to create a new repository is to click on the "Create a new repository" link after logging in to splitgraph.com, but this isn't the only way.
splitgraph.yml
files allow users to describe a repository in a declarative way, including
repositories representing external data sources such as Stripe. The sgr
command applies the contents of the YAML file, creating the repository on
splitgraph.com and registering the synchronization schedule.
Step 1: Install sgr
Its easiest to install sgr using pip, the Python package manager. The
following was tested on Ubuntu and OSX, but should work pretty much anywhere:
# create a new python venv
python3 -m venv venv
# activate the venv
. venv/bin/activate
# install the splitgraph sgr tool
pip install splitgraph
# authenticate with splitgraph.com using the same credentails as the website.
sgr cloud login
Note that Ubuntu might require some additional packages to be installed:
sudo apt install python3-venv python3-dev python3-cffi libffi-dev
Step 2: Create a splitgraph.yml file
There's several ways to create a
splitgraph.yml
file:
Get sgr to create it
Once you have sgr installed, you can ask it to generate a splitgraph.yml for
you:
sgr cloud stub airbyte-stripe neumark/stripe-data > splitgraph.yml
In the command above, airbyte-stripe is the name of the external data source
connector. You can list all available connectors by running sgr cloud plugins.
neumark/stripe-data is the fully qualified repository name, the format is
${USERNAME}/${REPOSITORY_NAME}. Choose a repository name which doesn't exist
yet (sgr will create it for you).
Generate the YAML on the website
You can visit this page to
see all external data sources supported by Splitgraph. There's quite a few!
Selecting "Stripe" will display a dialog with a generated splitgraph.yml.
Step 3: Fine-tuning and adding credentials
The generated stub gets us most of the way there, there's only a few fields which need to be changed:
| field name | contents |
|---|---|
client_secret | Stripe API key (usually starts with sk_live_) |
account_id | Stripe account ID (starts with acct_) |
tables | {} (to use default tables created by plugin) |
schedule | define frequency of sync (see below) |
Sync schedule
Schedules are defined by crontab strings:
   schedule:
     schedule: "0 */6 * * *"
     enabled: true
Note that it's also possible to use GitHub Actions to execute recurring synchronization between data sources and Splitgraph repositories.
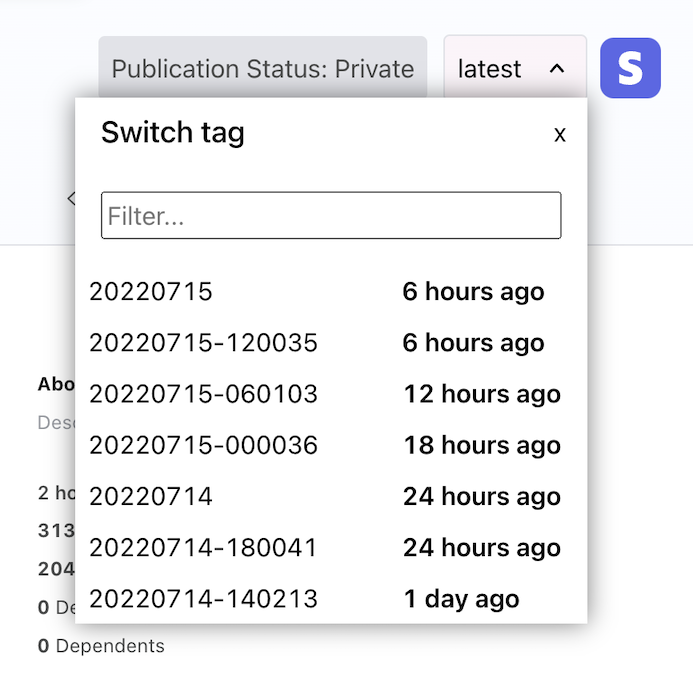
Each sync will create a new data image and tag it by the date which can be browsed on the repository page.
Full Configuration
credentials:
  airbyte-stripe:  # This is the name of this credential that "external" sections can reference.
    plugin: airbyte-stripe
    # Credential-specific data matching the plugin's credential schema
    data:
      client_secret: 'sk_live_XXX'
      normalization_git_url: '' # dbt model Git URL. For `custom` normalization, a URL to the Git repo with the dbt project, for example,`https://uname:pass_or_token@github.com/organisation/repository.git`.
repositories:
- namespace: neumark
  repository: stripe-data
  # Catalog-specific metadata for the repository. Optional.
  metadata:
    readme:
      text: Readme
    description: Description of the repository
    topics:
    - sample_topic
  # Data source settings for the repository. Optional.
  external:
    # Name of the credential that the plugin uses. This can also be a credential_id if the
    # credential is already registered on Splitgraph.
    credential: airbyte-stripe
    plugin: airbyte-stripe
    tables: {}
    # Plugin-specific parameters matching the plugin's parameters schema
    params:
      account_id: 'acct_XXX'  # REQUIRED. Account ID. Your Stripe account ID (starts with 'acct_', find yours <a href="https://dashboard.stripe.com/settings/account">here</a>).
      start_date: '2017-01-25T00:00:00Z' # REQUIRED. Replication start date. UTC date and time in the format 2017-01-25T00:00:00Z. Only data generated after this date will be replicated.
      normalization_mode: basic # Post-ingestion normalization. Whether to normalize raw Airbyte tables. `none` is no normalization, `basic` is Airbyte's basic normalization, `custom` is a custom dbt transformation on the data.. One of none, basic, custom
      normalization_git_branch: master # dbt model Git branch. Branch or commit hash to use for the normalization dbt project.
      lookback_window_days: 0 # Lookback Window in days (Optional). When set, the connector will always re-export data from the past N days, where N is the value set here. This is useful if your data is frequently updated after creation. More info <a href="https://docs.airbyte.com/integrations/sources/stripe#requirements">here</a>
    # Whether live querying is enabled for the plugin (creates a "live" tag in the
    # repository proxying to the data source). The plugin must support live querying.
    is_live: false
    # Ingestion schedule settings. Disable this if you're using GitHub Actions or other methods
    # to trigger ingestion.
    schedule:
      schedule: "0 */6 * * *"
      enabled: true
Step 4: Applying splitgraph.yml
The final step is applying our new splitgraph.yml file using sgr. Don't
forget to change the fully qualified repo name to something under your own
username.
# Create repository
sgr cloud load --initial-private -f splitgraph.yml  neumark/stripe-data
# Manually trigger first sync from Stripe
sgr cloud sync -f splitgraph.yml neumark/stripe-data
Note the --initial-private switch. The repository can be shared with other
users or made public later.
Once these commands have run and the data from Stripe has been synced, we query any table created by the plugin. For example, the following query calculates the total sum of all account transactions by currency:
SELECT
    "currency",
    SUM("amount") as total
FROM
    "neumark/stripe-data:latest"."balance_transactions"
GROUP BY currency
Get back to us!
Have you found a cool way to use external data sources with Splitgraph? Did you run into any issues? Either way, let us know!
Splitgraph
Made with


on four continents.