Splitgraph has been acquired by EDB! Read the blog post.
splitgraph.yml: Terraform for your data stack
We showcase the splitgraph.yml format, which lets you programmatically manage your datasets on Splitgraph, change their data source settings and define dbt transformations.
What is Splitgraph?
Splitgraph is building the Unified Data Stack – an integrated and modern solution for working with data without worrying about its infrastructure.
You can try Splitgraph now! Browse the public data catalog to discover 40,000+ repositories to query with SQL, through the web IDE or any Postgres client.
Introduction
There is a trend in data engineering to apply best practices from software engineering, for example, version control and code reviews. Splitgraph itself was originally inspired by Git and Docker, both famous developer tools.
Another DevOps tool we like is Terraform: it lets you use a declarative configuration language to define your cloud infrastructure. Terraform then takes care of interpreting this configuration and calling cloud vendor-specific APIs to create/destroy resources and align the real state of the world with the desired configuration.
We built something similar for the data stack: splitgraph.yml, or Splitgraph Cloud project files.
You can think of splitgraph.yml as a Terraform file that lets you programmatically configure a dataset in Splitgraph, including its:
- metadata (README, tags, description)
- data source settings (databases, SaaS services, flat files)
- ingestion schedule
- dbt transformations
We use this format ourselves to declare data ingestion pipelines with Airbyte, build our own data warehouse with dbt and organize them in our Splitgraph data catalog (see a previous blog post for more details!)
In this post, we'll talk about how you can use splitgraph.yml to define your own data pipeline and show an end-to-end example that ingests some sample data from Socrata and transforms it using dbt.
Example splitgraph.yml file
Here is a basic example that builds two Splitgraph repositories:
- splitgraph-demo/for-hire-vehicles: List of active for-hire vehicles in New York City (source)
- splitgraph-demo/for-hire-vehicles-summary: dbt transformation that summarizes the data in the first repository
repositories:
- namespace: splitgraph-demo
  repository: for-hire-vehicles
  # Catalog-specific metadata for the repository.
  metadata:
    readme:
      text: For more information, see https://www.splitgraph.com/cityofnewyork-us/for-hire-vehicles-fhv-active-8wbx-tsch
    description: New York Active For Hire Vehicles
    topics:
    - socrata
    - new york
  # Data source settings
  external:
    plugin: csv
    params:
      connection:
        connection_type: "http"
        url: ""  # Will be overridden by the individual table
    tables:
      vehicles:
        options:
          url: "https://data.cityofnewyork.us/api/views/8wbx-tsch/rows.csv?accessType=DOWNLOAD"
        # Schema of the table (set to [] to infer)
        schema: []
    # Enable live querying for the plugin (creates a "live" tag in the
    # repository proxying to the data source).
    is_live: true

# dbt model that processes the previous repository
- namespace: splitgraph-demo
  repository: for-hire-vehicles-summary
  external:
    plugin: dbt
    credential: dbt-sample
    params:
      sources:
      # Map dbt source names to Splitgraph repositories
      - dbt_source_name: for_hire_vehicles
        namespace: splitgraph-demo
        repository: for-hire-vehicles
        hash_or_tag: latest
      git_branch: $THIS_SHA
    is_live: false
    tables: {}
  metadata:
    description: Sample dbt model
    readme:
      text: "## Sample dbt model\n\nThis is a model referencing data\
        \ from:\n\n  * [/splitgraph-demo/for-hire-vehicles](/splitgraph-demo/for-hire-vehicles)"
The full project that uses this file is located on our GitHub. You can also query the resultant dataset on Splitgraph:
Writing splitgraph.yml files
Quick method: generating a Splitgraph Cloud project from a seed
The simplest way to get started with splitgraph.yml is by using our new "project seeds" functionality. This will generate a GitHub repository for you with a splitgraph.yml file, a dbt model and a GitHub Action file that you can use as a starting point to define your own pipeline.
We've done some magic to make the process smooth for you, so you can select data sources, copy a repo on GitHub, and paste a seed value into a GitHub action, to set up all your boilerplate.
Click the button to get started:
Splitgraph supports over 100 sources. These include SaaS services (powered by the open Airbyte standard) as well as "live queries" to the most popular RDBMSs and data warehouses. The latter, powered by PostgreSQL Foreign Data Wrappers, lets you query data through Splitgraph without having to load it.
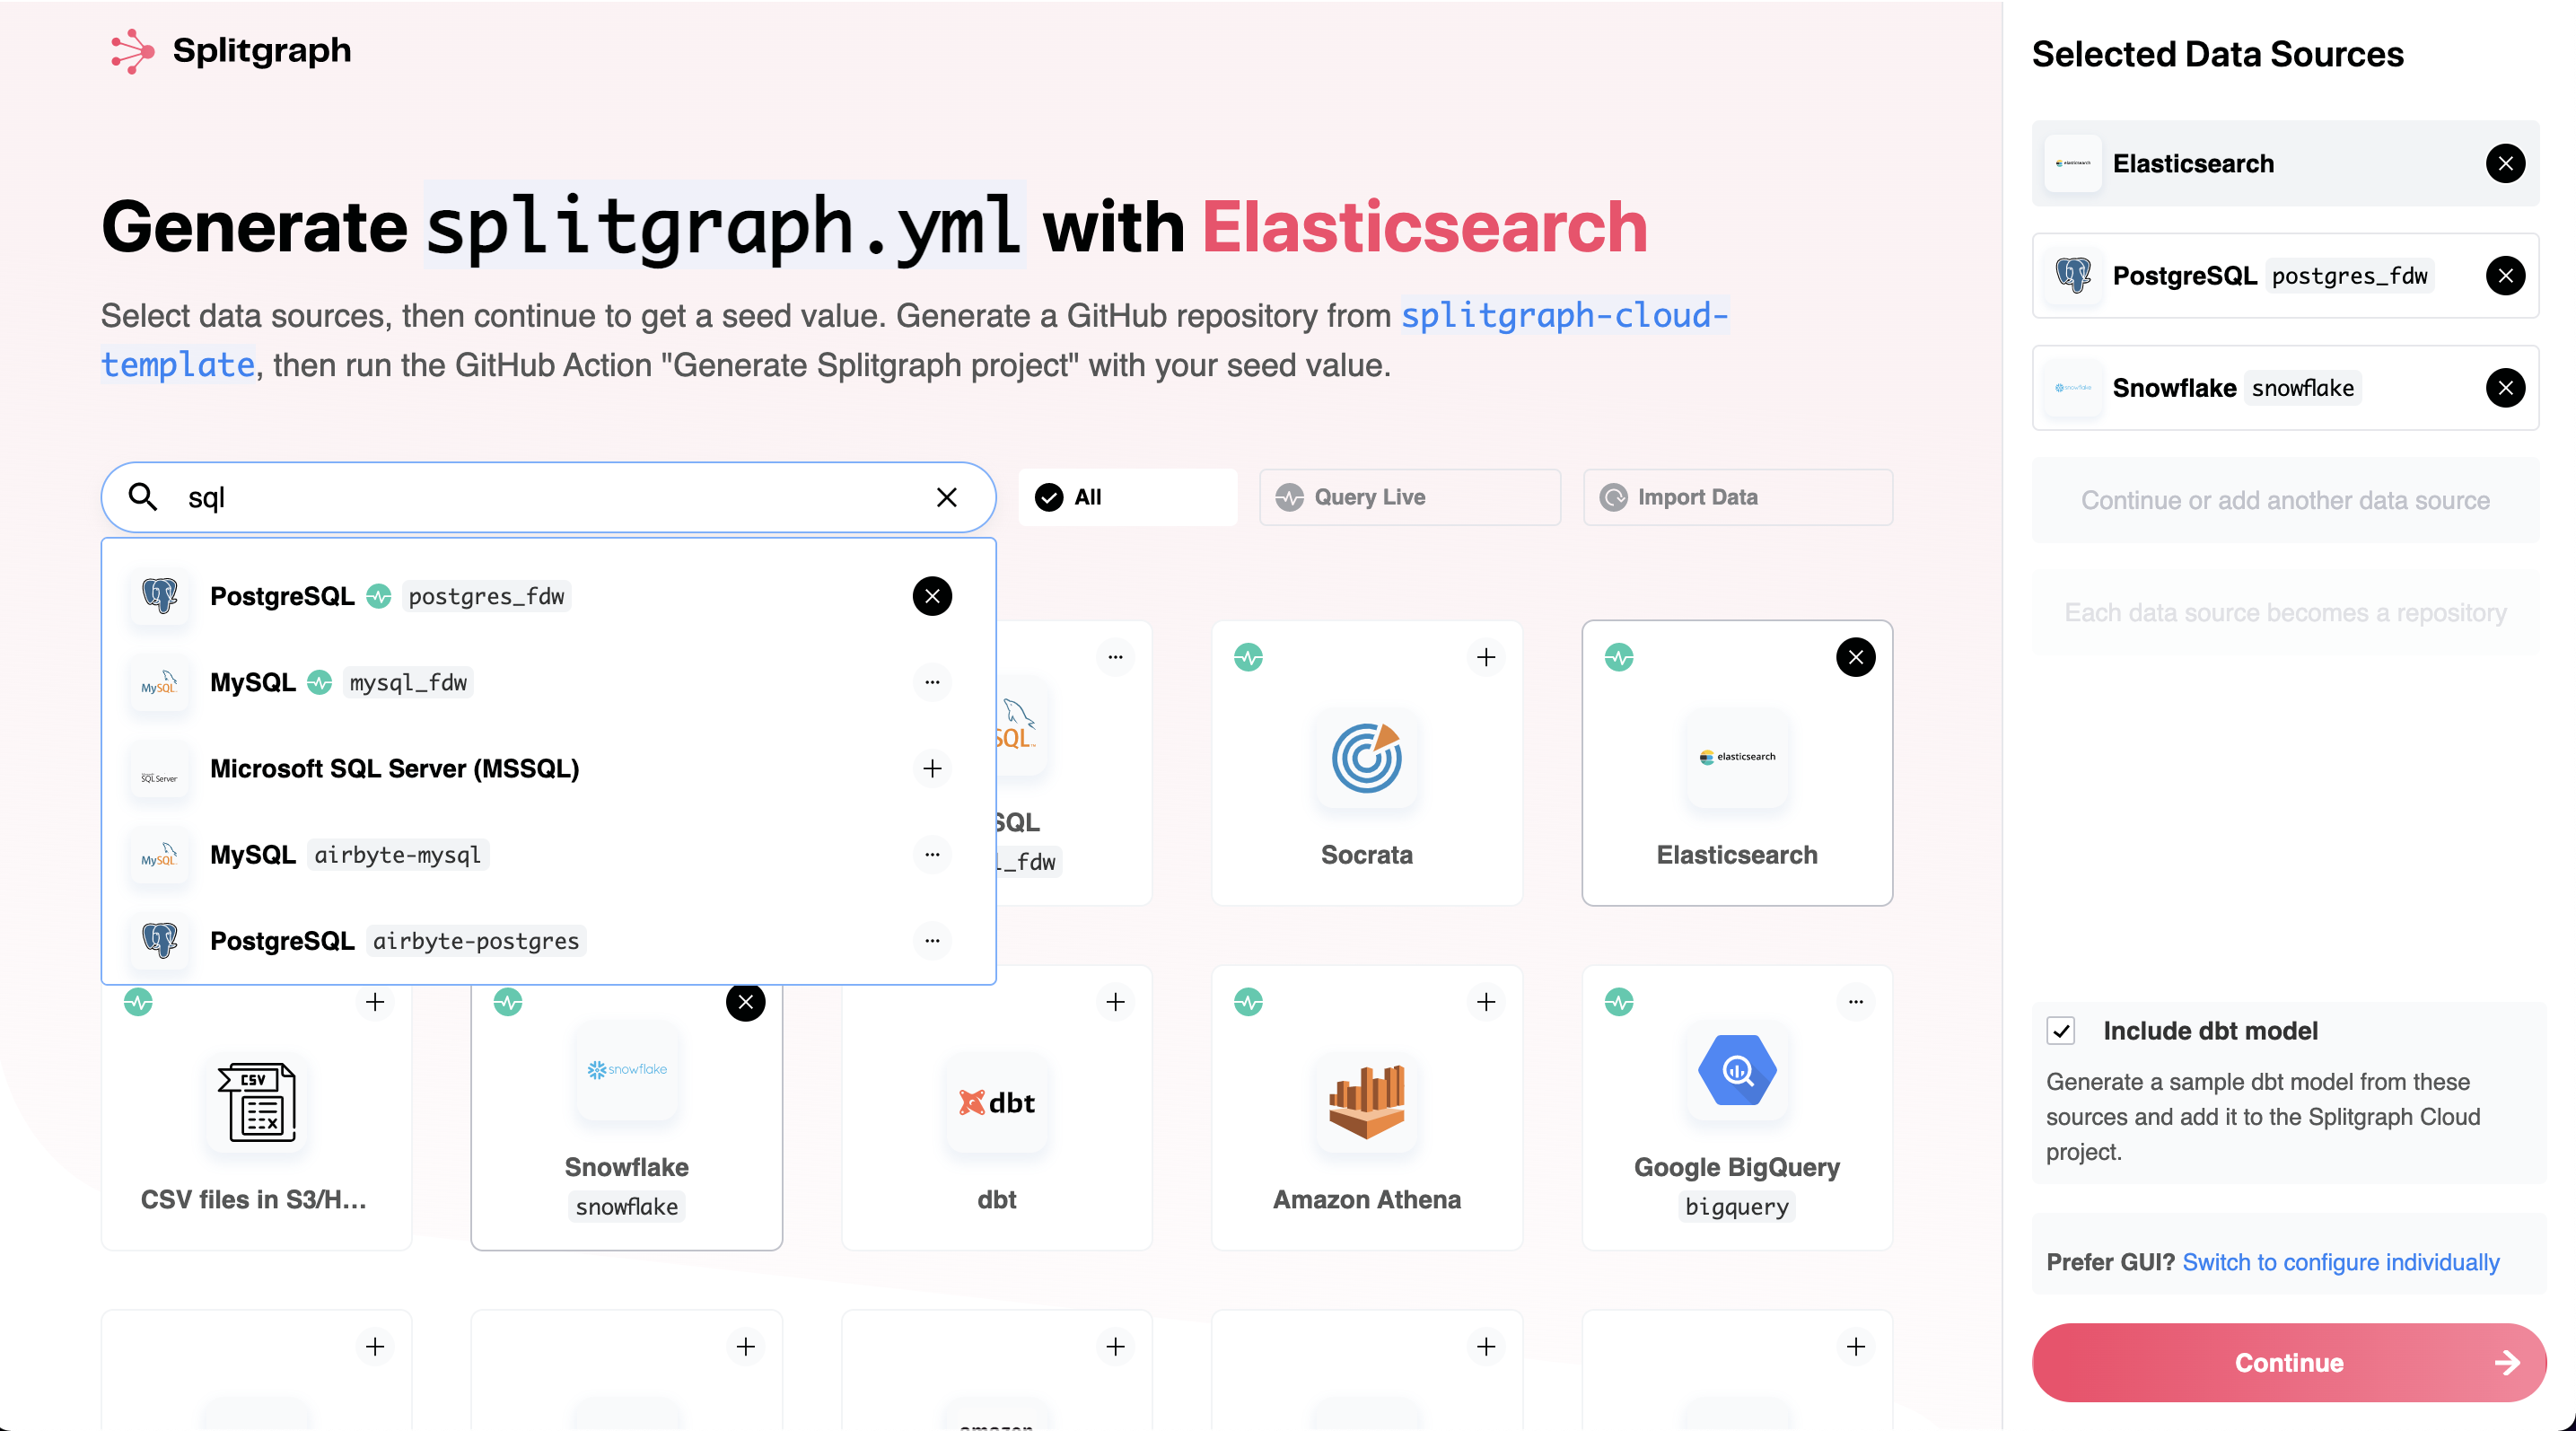
The wizard will guide you through using our Splitgraph Cloud template project to generate a project from a "seed" (a representation of the data sources you chose).
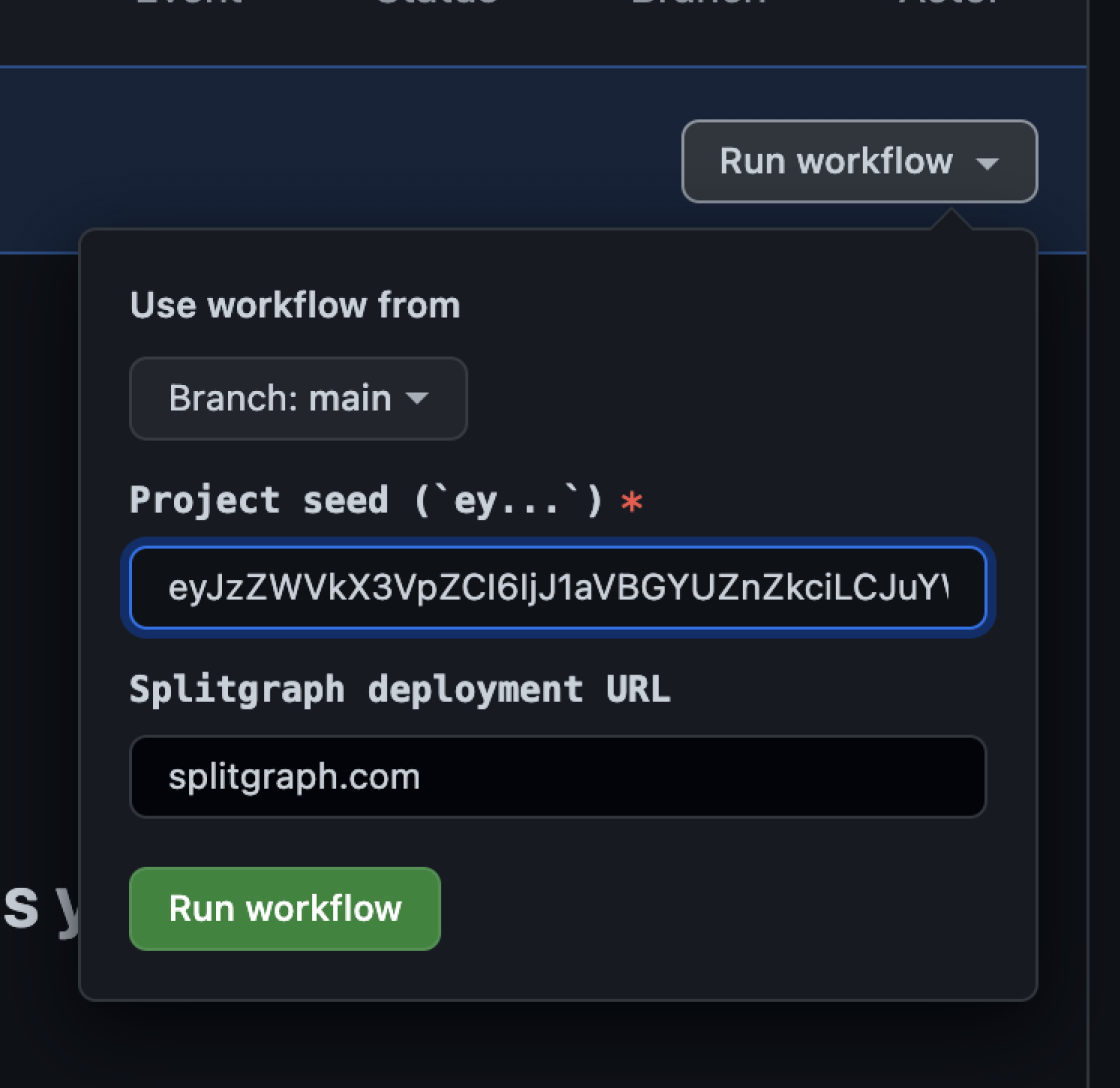
After you go through the process, you will end up with a repository with Splitgraph Cloud project files:
- A
splitgraph.ymlfile that defines your chosen data build.moveme.ymlin the root with a GitHub Action definition used to ingest the data on a schedule or on-demand- Sample dbt model that references data from all the datasets you added
We created the example project using this method.
You will need to perform some extra steps to finish the setup (see the README in the generated repository for more information):
- Set up your Splitgraph API keys (we call them "SQL credentials", as you can also use them to connect to Splitgraph's PostgreSQL-compatible endpoint) as GitHub Secrets
- Add credentials to
splitgraph.credentials.yml(not required for our sample project, as the Socrata endpoint we're using to get the data is public) - Edit
splitgraph.ymlto set up the data source parameters - Set up GitHub Actions (copy
build.moveme.ymlto the.githubdirectory)
Advanced method: using splitgraph.yml with the sgr CLI
The example GitHub Action above calls the sgr CLI to interact with Splitgraph Cloud and manage datasets and pipelines.
You can run the same commands from your development machine or from another workflow orchestrator, like GitLab CI. Let's look at these commands in detail.
sgr cloud stub: generate a splitgraph.yml file
This command will generate a basic splitgraph.yml file for a specific plugin. You can use this file as a starting point (documentation).
$ sgr cloud stub csv splitgraph-demo/csv
credentials:
  csv:  # This is the name of this credential that "external" sections can reference.
    plugin: csv
    # Credential-specific data matching the plugin's credential schema
    data:
      s3_access_key: ''  # AWS Access Key
      s3_secret_key: '' # AWS Secret Access Key
repositories:
- namespace: splitgraph-demo
  repository: csv
  # Catalog-specific metadata for the repository. Optional.
  metadata:
    readme:
      text: Readme
    description: Description of the repository
    topics:
    - sample_topic
  # Data source settings for the repository. Optional.
  external:
    # Name of the credential that the plugin uses. This can also be a credential_id if the
    # credential is already registered on Splitgraph.
    credential: csv
    plugin: csv
    # Plugin-specific parameters matching the plugin's parameters schema
    params:
      connection:  # Connection. Choose one of:
      - connection_type: http  # REQUIRED. Connection type. Constant
        url: '' # REQUIRED. URL. HTTP URL to the CSV file
      - connection_type: s3  # REQUIRED. Connection type. Constant
        s3_endpoint: '' # REQUIRED. S3 endpoint. S3 endpoint (including port if required)
        s3_bucket: '' # REQUIRED. Bucket name. Bucket the object is in
        s3_region: '' # S3 region. Region of the S3 bucket
        s3_secure: false # Secure. Whether to use HTTPS for S3 access
        s3_object: '' # S3 Object name. Limit the import to a single object
        s3_object_prefix: '' # S3 Object prefix. Prefix for object in S3 bucket
...
sgr cloud load: set up the catalog metadata
This command (documentation) uploads the README, tags, description as well as external data source settings and credentials to Splitgraph Cloud.
sgr cloud sync: run a data load
This command (documentation) starts an ingestion job. If you previously ran sgr cloud load, you can use the existing data source settings uploaded to Splitgraph Cloud. You can also make this command use an existing splitgraph.yml file, which will run ingestion without Splitgraph Cloud storing your data source credentials.
Miscellaneous sgr cloud commands
There are other useful sgr cloud commands. See our documentation for a full list:
sgr cloud upload: upload a CSV file to Splitgraph Cloudsgr cloud download: export a SQL query result as a CSV filesgr cloud plugins: search for data source pluginssgr cloud search: search for repositoriessgr cloud sql: run SQL queriessgr cloud status: check the status of ingestion jobs
splitgraph.yml reference
An in-depth reference for the splitgraph.yml format is available here.
In Alpha: Web UI
Configure datasets individually via the web GUI. You can try it here, but note it's in alpha status and some configurations are not yet fully supported:
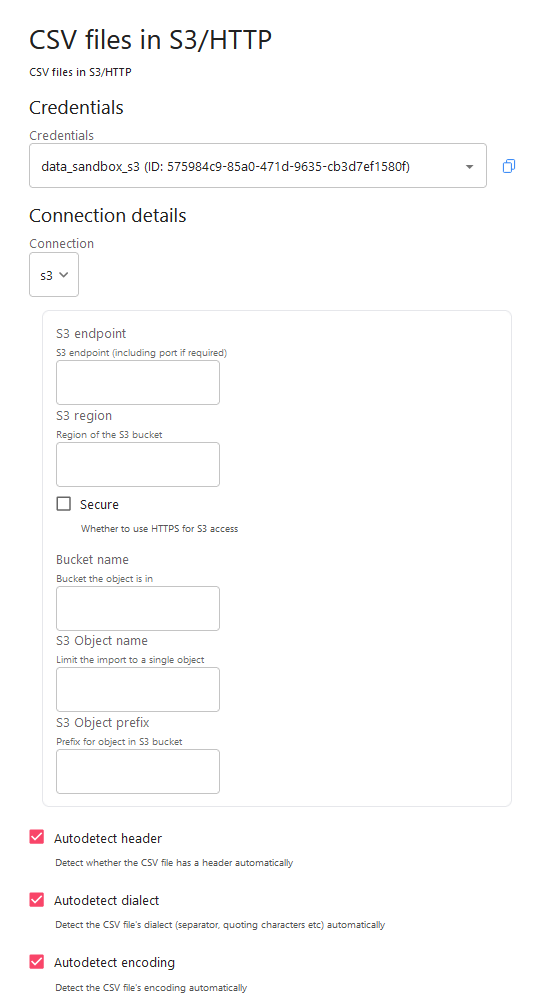
You can still store your catalog in the splitgraph.yml format with this method: use the sgr cloud dump command to dump existing repositories to splitgraph.yml.
Conclusion
In this blog post, we showcased splitgraph.yml: a configuration format that lets you programmatically manage your datasets on Splitgraph. You can find an example project on our GitHub.
The example project also shows how to make the data repositories that you build private. You can then use our sharing settings and invites functionality to manage who has access to your datasets and invite collaborators.
Interested in tighter security guarantees or more team features? We also provide private versions of Splitgraph Cloud, deployed to a cloud vendor and region of your choice. Feel free to try it out!
Splitgraph
Made with


on four continents.